Take your next creative step. Kawaii REC Complete Guide
Your first recording. Your finishing touches. Find the features you need, when you need them—with real screenshots and step-by-step instructions.
Explore all 12 chapters
Start with what you want to create
Record and mix a song cover
Import a backing track you are allowed to use, then record vocals while listening on headphones. Check a short take for clipping and timing before editing clips and mixing. Check the permissions for your backing track and artwork before posting.
You can record without a backing track. Work in short takes, crop unwanted sections and adjust track volume and pan. After exporting, listen to the file in another player to check the result.
Finish the audio, then open MV export. Combine a background, character artwork and spectrum effects, and test a short section first. MV export requires access to that feature. It is not live-streaming software or a host for external VST plug-ins.
No chapters found. Try searching with a different word or clearing and choosing from the table of contents.
01 / START HERE
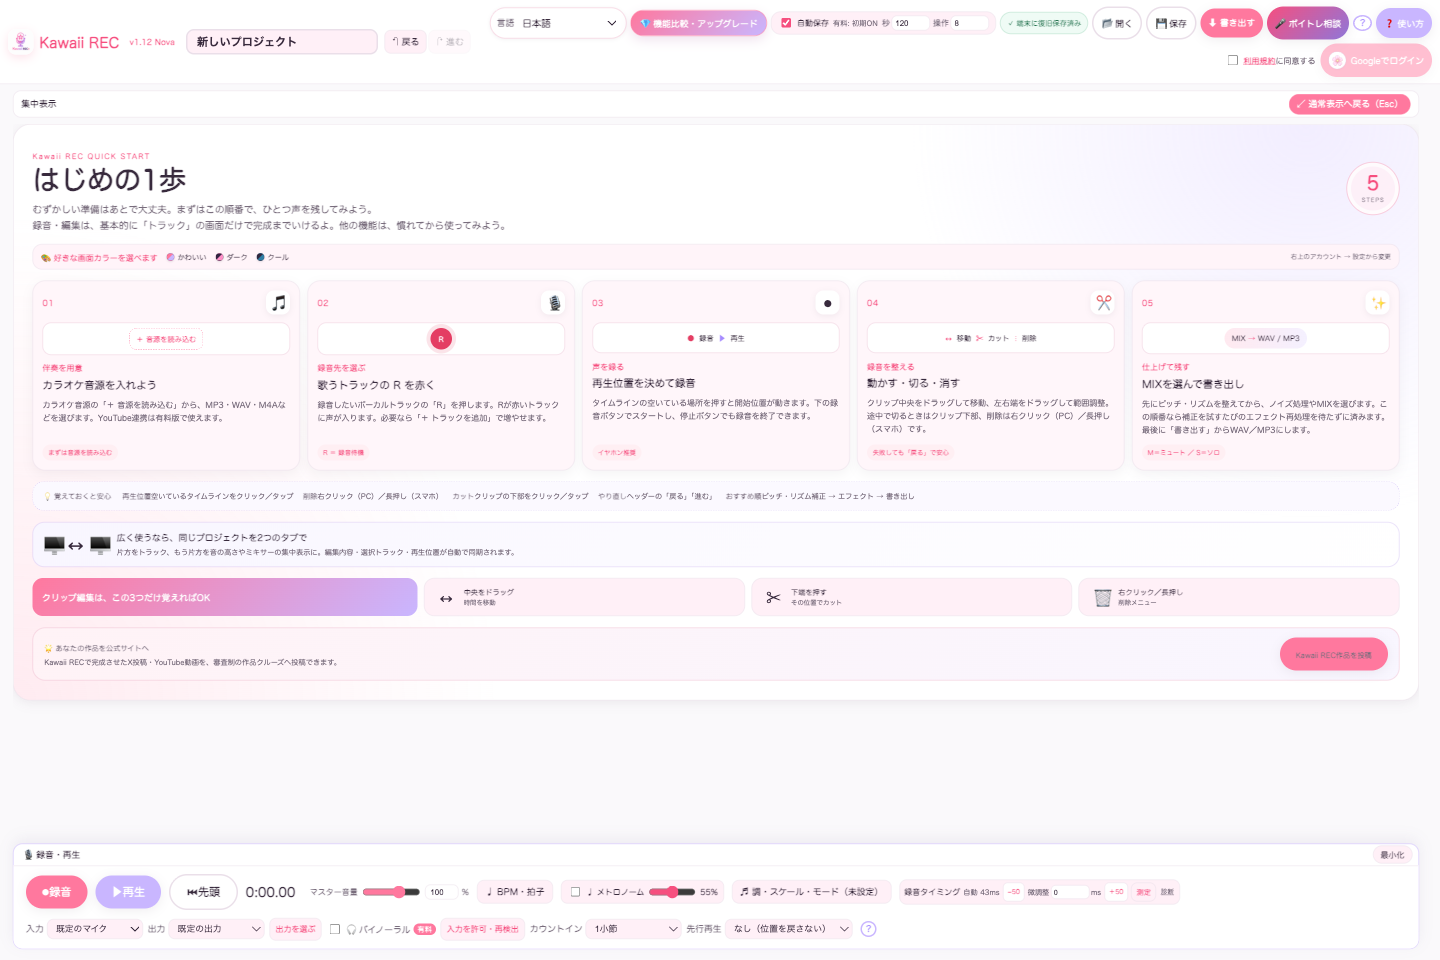
Start in the Tracks view. Make your first recording.
The web app needs no installation. Get your microphone and headphones ready, then open the app. Most recording and editing can be done in Tracks. Explore the other views as you get comfortable.
Import a backing track
Choose a file with “+ Import audio” on the backing track. Spoken-word recordings don't need accompaniment. Supported formats include MP3, WAV, M4A and others your browser can decode.
Choose your input and make a short test
Check your microphone under Input in the recording/playback panel, then use the permission/redetection control to allow access. With external microphones, make several short test recordings and play them back to confirm the intended input is being used.
Arm the destination track with R
R on a vocal track arms it for recording. Audio is recorded to the track whose R button is red. Add tracks as needed with “+ Add track”; the free plan allows three tracks in total, including the backing track.
Choose a starting point and record
Click or tap an empty part of the timeline to set the starting position, then select Record. Stop when you're done and press Play to listen back. Count-in and metronome options can help you come in on time.
Save and listen back
Save the project, then check for clipping, timing issues or missing audio. Export your finished recording as WAV or MP3 and keep a copy on your device. Cloud saving requires Google sign-in.
Recorded and imported audio appears as clips. Use Tracks for the overall arrangement and Pitch for detailed note editing. Switch views to suit the task.
Move, cut, crop and delete
Drag the middle of a clip to move it along the timeline. Drag its left or right edge to crop it, or press its bottom edge to cut at that point. Right-click on desktop or press and hold on mobile to open the deletion menu. Use Undo and Redo if needed. The handles at the upper left and right adjust fades.
Seconds/bars, loops, markers, BPM
Switch the timeline between seconds and bars. Set A and B points to loop a phrase you want to revisit. Add markers as reference points. BPM and time-signature settings also support tempo and meter changes within a song. Paid access includes backing-track BPM estimation.
Mute, solo, record-arm, volume and pan
M mutes, S solos and R arms a track for recording. When a track is soloed, only soloed tracks are exported. Balance each track with volume and left/right pan. Open the Mixer for an overview, shared effects using SEND A/B and RETURN, and MASTER controls.
Layout, focus view and multiple tabs
Use Layout to show the views you need, then drag their headings to reorder them. Focus view gives one task more space. You can open the same project in multiple tabs—for example, Tracks in one and Pitch in another. Account display settings also let you hide automation or Effects Rack to free up vertical space.
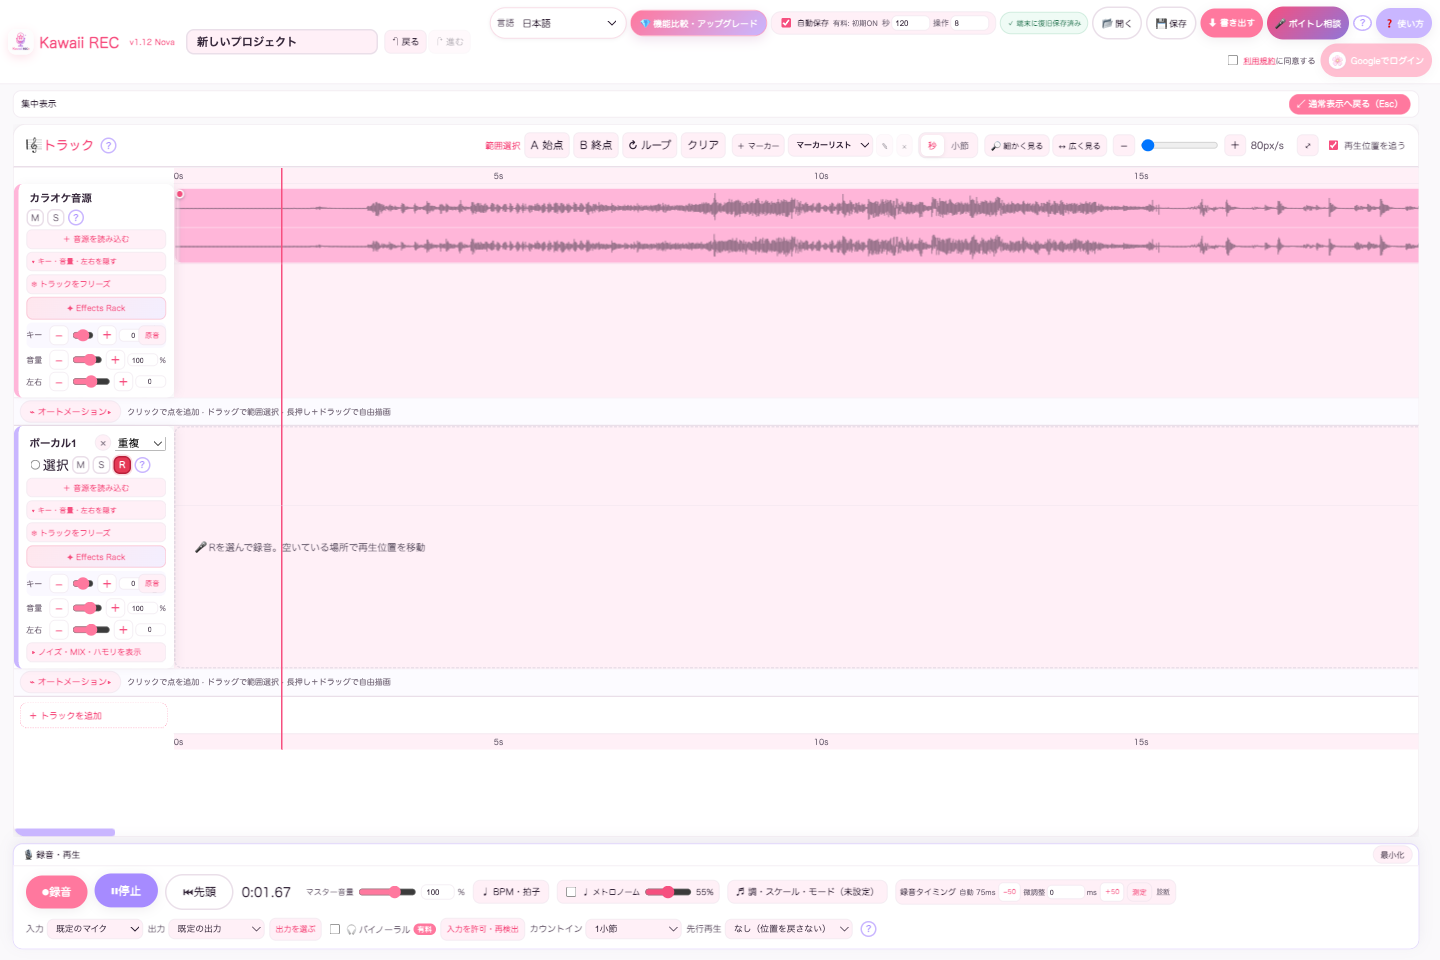
Actual local-app capture: importing and playing a sample backing track.
03 / PITCH & RHYTHM
Keep the character of your voice. Fine-tune pitch and timing.
For Windows and Mac
In Pitch view, your voice appears as notes you can adjust individually. Pitch correction is currently free through October 31, 2026. Timing correction requires paid access.
Adjust pitch, step by step
Record or import a vocal, then select its track.
Open Pitch view and inspect the detected notes.
Move a note up or down to adjust its pitch. Split notes where you need more precise control.
Play the surrounding phrase too. Listen for natural phrasing, not just the right notes.
Formants affect vocal tone. Treat pitch and tone as separate choices, making small adjustments and comparing them to find the sound you want.
Timing correction
Moving notes horizontally, changing their length and automatic alignment require paid access. Listen to consonants and phrase endings as you adjust timing. Completing pitch and timing edits before noise reduction and effects can reduce repeated processing waits.
These tools edit recorded audio; they are not a real-time voice changer for calls. For the conditions of the free-access extension, see the campaign chapter.
04 / MIX & HARMONY
Find the right sound. Clean up noise. Build vocal harmonies.
Open the vocal track's noise, MIX and harmony panel to find the finishing controls together. You don't have to use everything. Apply only the processing your recording needs.
Five MIX presets
Choose As Is, Studio, Hall, Radio or Whisper. Presets other than As Is apply gain, EQ, compression and other processing based on analysis. Adjust the amount while listening. When preparing audio for a mixing engineer, usually choose As Is and supply unprocessed material.
Paid: three noise processors
Adjust background noise, mouth clicks and sibilance separately. First identify what you hear: room noise, clicking or harsh S sounds. Strong processing can change vocal texture, so compare both quiet sections and sung passages.
Paid: two automatic harmony parts
Set the key, scale and mode, then choose harmony intervals. Each of the two parts has volume, pan, left/right split and low-/high-cut controls. If the top end is piercing, try a little high cut; if the low end is muddy, try low cut.
To edit a harmony note by note, isolate the harmony, solo the relevant track and export it. Import that audio onto another track and edit it in Pitch view. Save a separate copy of the original project first.
Paid: YouTube integration
The official embedded player streams accompaniment. YouTube audio is neither downloaded nor included in exports. To export a performance with accompaniment, separately import an audio file you have permission to use.
05 / AUTOMATION
Widen the chorus. Let the last word linger. Draw how your sound evolves.
Automate volume, pan and supported Effects Rack parameters over time. Automation is available to everyone, but access to the effect itself is still required.
Create a lane and add points
Open Automation beneath the track.
Choose a parameter in the upper-right controls and add a lane. Volume, pan and other parameters each have their own lane.
Click or tap the lane to add points.
Select a point to set its value and the curve leading to the next point. Volume is shown in dB and pan in L/R values.
Choose linear, smooth, stepped or accelerating transitions. Switching the timeline to bars also changes automation lanes to bars.
Freehand drawing, selection and deletion
Press and hold, then drag to draw freely. Drag without holding first to select a range of points. Delete selected points with the upper-right control. Drawing over an existing time range replaces that range with the new line. Deleting a lane removes its automation and restores the normal parameter value.
Keep your lanes readable
Use each lane's visibility checkbox to show or hide it, and drag its upper or lower edge to resize it. Hiding a lane does not delete it or stop its automation. To remove automation, select and delete the relevant lane.
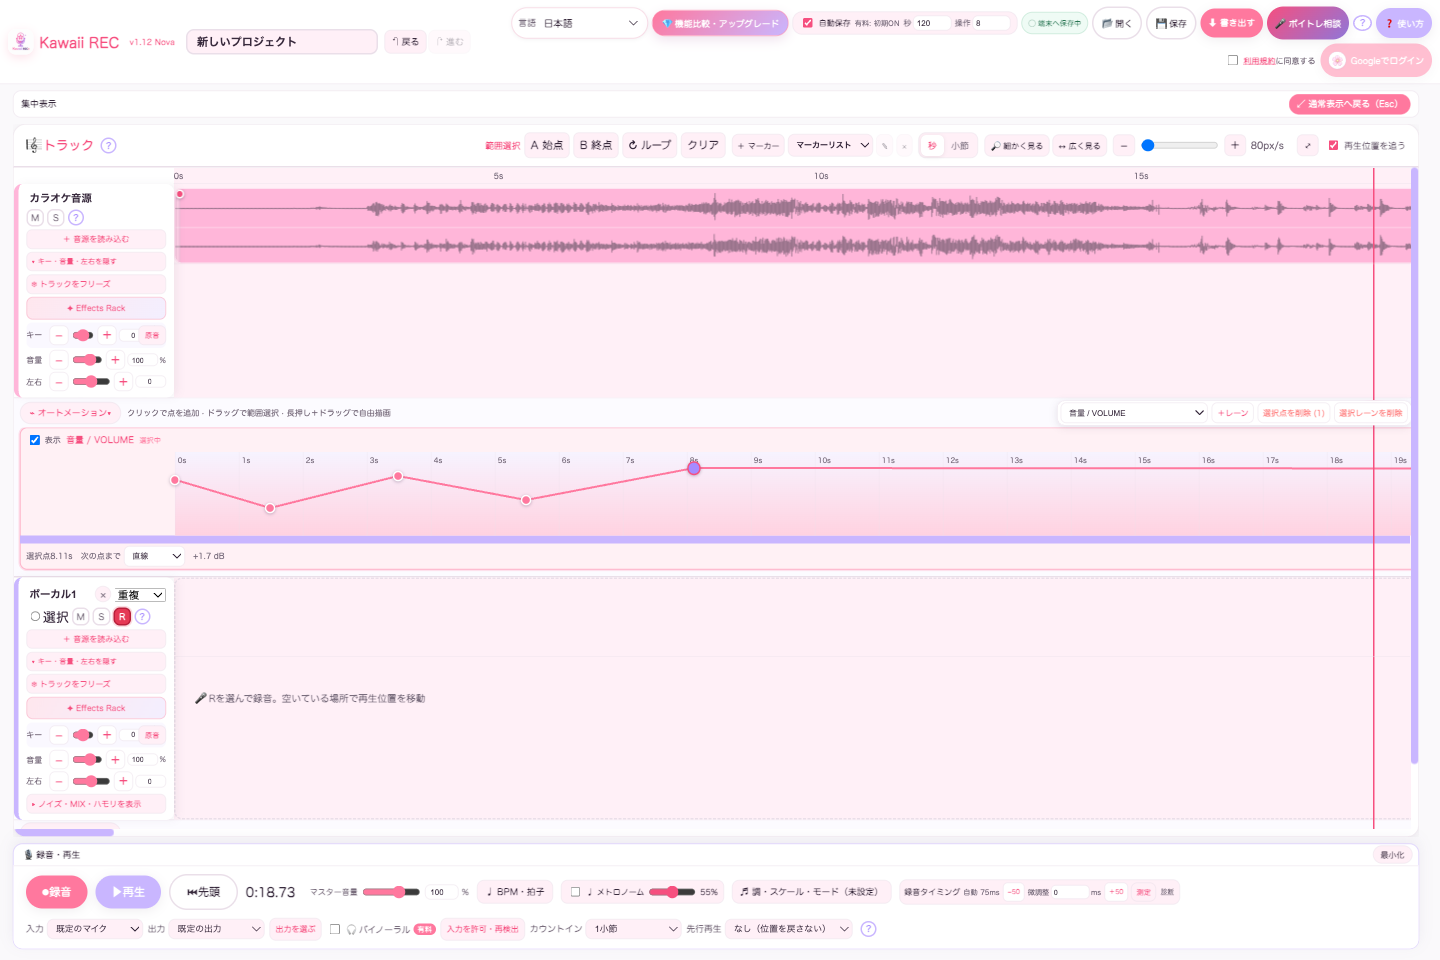
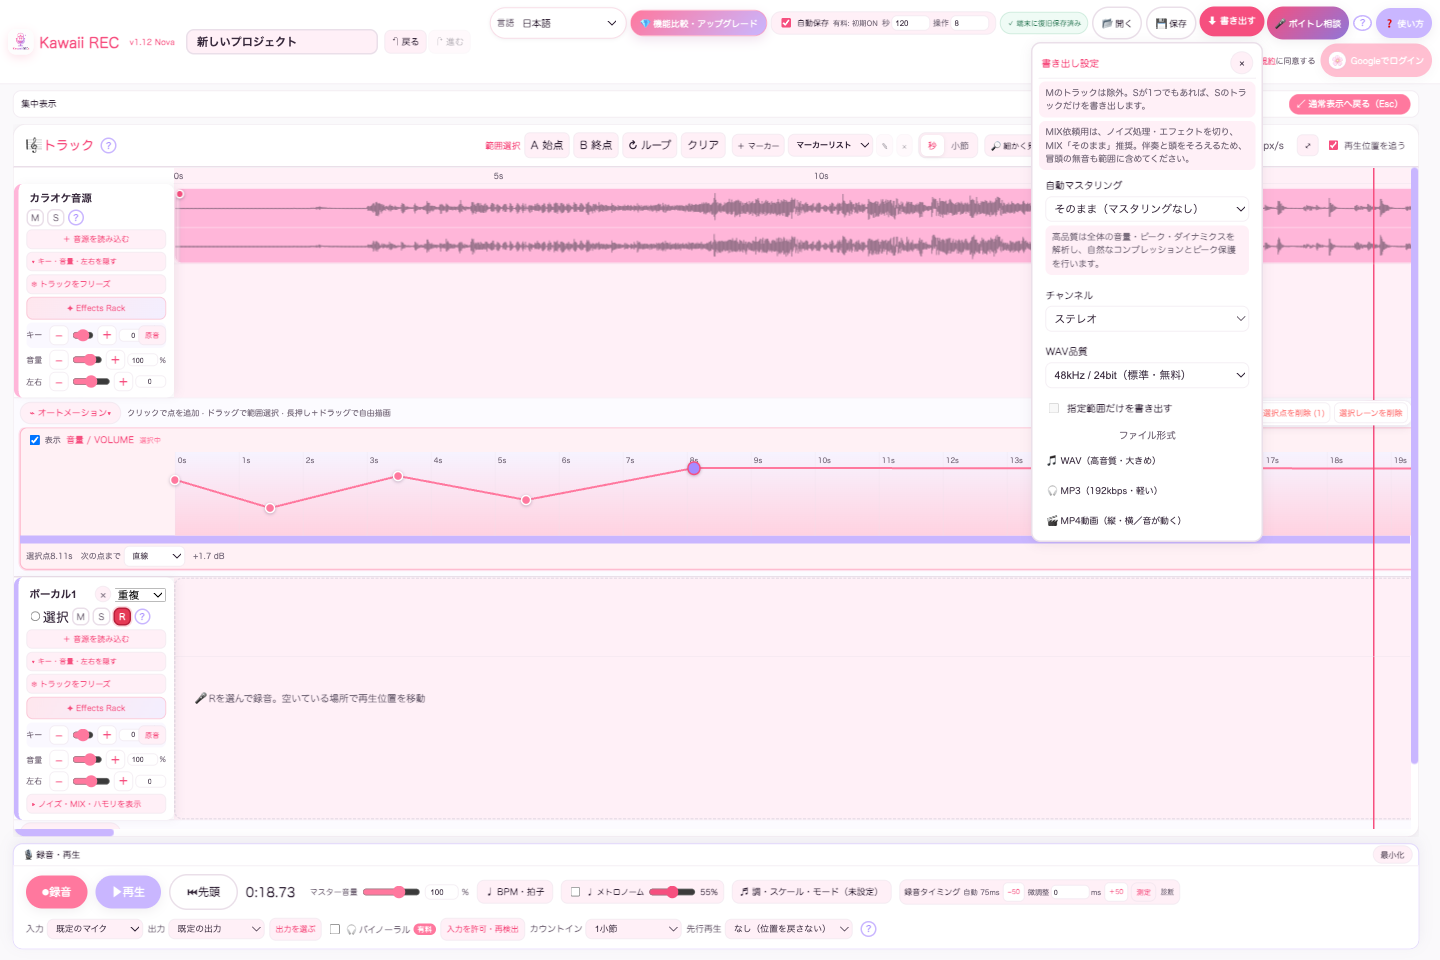
Volume points added during a real app walkthrough.A silent, nine-second walkthrough: from export settings to playback with automation.
06 / KAWAII EFFECTS RACK
Shape your own signal chain. Eleven effects to explore.
Open Effects Rack from a track. Studio view puts the knobs in front of you; Routing view lets you inspect and change the processing order. Enable only the effects you need.
POP CUTClean up the low end
S CLEARSoften sibilance
VOICE EQShape tone by frequency
DISTORTIONAdd warmth or distortion
PHASERCreate a sweeping, swirling texture
TREMOLOPulse the volume
LEVELEven out loud and quiet passages naturally
COMPControl dynamics and impact
CLIP GUARDKeep peaks in check
DELAYShape your echoes
REVERBAdd reverb and a sense of space
Spectrum, EQ and routing
Watch the frequency distribution in the spectrum and adjust tone using the EQ points. Compare IN and OUT, trusting your ears as well as the display. Reorder effects in Routing to change the signal chain. Order matters, so start with a few effects and listen to the differences.
Free effects, FULL and VST3/AU
LEVEL and DISTORTION are free. FULL is a separate lifetime add-on, normally US$70 or US$50 for annual and lifetime users. It includes VST3/AU editions with the same functionality and a different interface.
Native installers are free to download, but export requires an applied license. Check your purchase or eligible benefit, download a license file from Effects Rack License in the account menu, then register it in the native plug-in. Choose VST3 on Windows or a compatible VST3/AU version on Mac and follow the included instructions.
Open Export in the header and choose settings for your destination. Muted tracks are excluded; when any tracks are soloed, only those are exported. Check mute and solo states before you begin.
WAV and MP3 settings
WAV defaults to 48 kHz/24-bit, including on the free plan. You can choose 44.1 kHz/16-bit for compatibility, mono or stereo, and a selected time range. MP3 uses 192 kbps for smaller, easy-to-share files.
Paid access also offers 96 kHz/24-bit, 192 kHz/24-bit and automatic mastering. Choose options to suit your destination and how the result sounds—for example, around −14 LUFS for YouTube or −9 LUFS for CD. A higher sample rate alone cannot add information missing from the recording.
Make an MP4 video
Choose MP4 video, then portrait or landscape output.
Pick a background or upload an image you have permission to use.
Add characters and adjust each one's size and vertical position.
Choose spectrum and waveform visuals and an animation template.
Check the sound and composition in the preview, then export.
Character size ranges from 0–1,000%, with vertical position adjustable by ±200%. Spectrum and waveform visuals have separate size and position controls, gray-background toggles and front/behind-character layering. Circular and particle styles let the picture move with the music.
Check your account's access details for MV eligibility. Access equivalent to a paid core plan allows the logo to be toggled. For free users accessing MV export through invitation benefits, the Kawaii REC logo stays on.
Switching between 48 kHz/24-bit and 44.1 kHz/16-bit on the free plan.An existing official MV export sample showing the finished result, separate from the new walkthrough recording.
08 / BEYOND THE STUDIO
Discover your voice. Capture an idea. Polish it with AI.
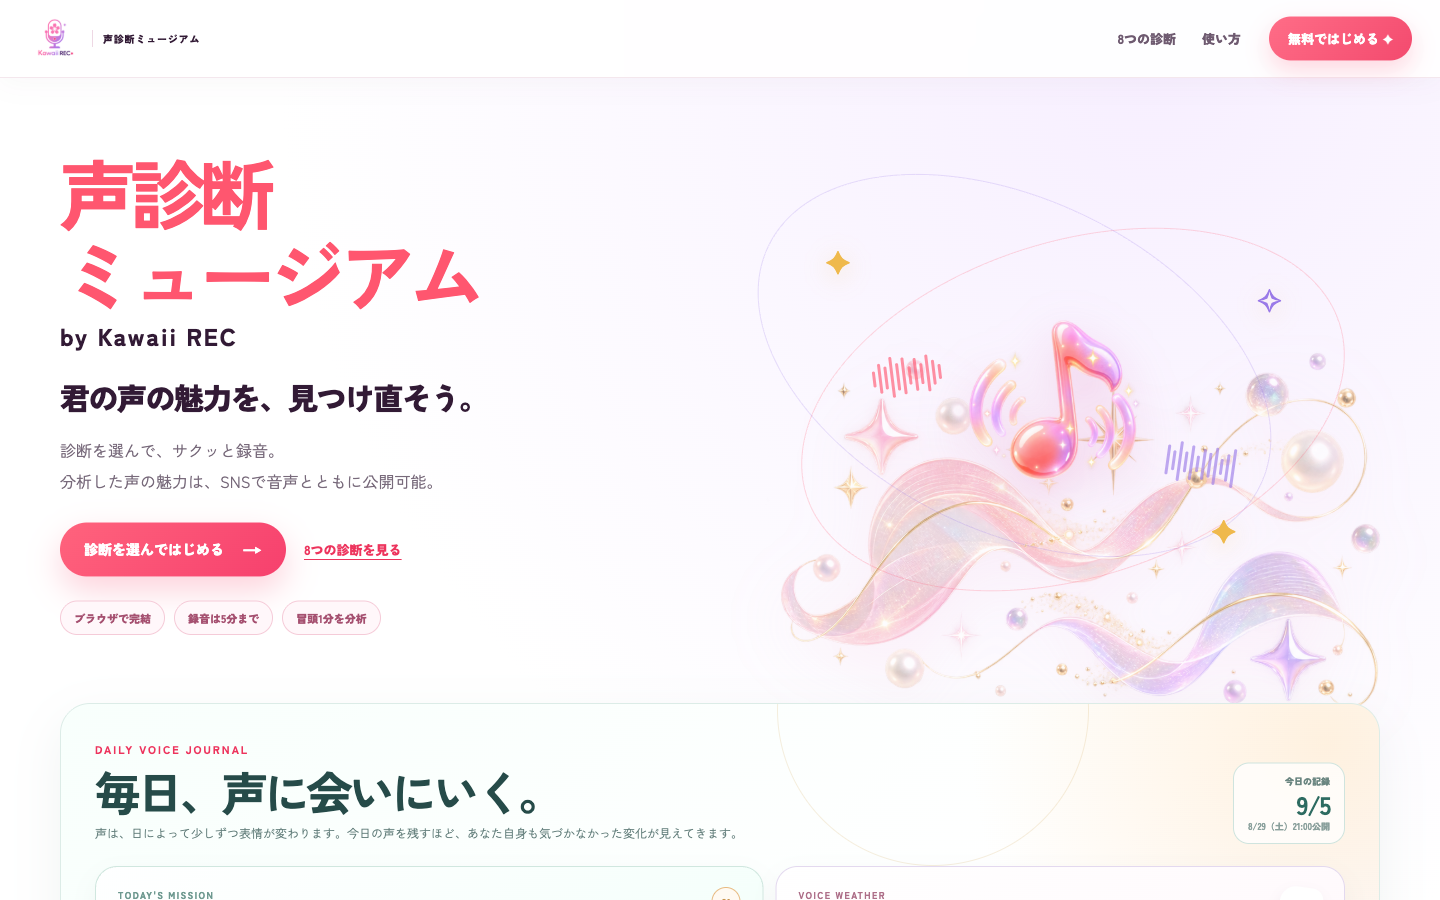
Voice Diagnosis Museum
Visit the museum to choose an available test. Getting started requires accepting the terms and connecting your Google account. You can then record in the browser or add audio. Recording lasts up to five minutes; analysis uses the first minute. The test list shows what's available, including voice constellations, 1/f fluctuations, voice compatibility, pitch, rhythm and daily voice tests. Eight types are being rolled out.
Share results on social media and choose whether your recording is public or private. Add an avatar, bio and social links to your profile as a home for your voice activities. These analyses are for entertainment and self-understanding, not medical diagnosis or an absolute assessment of singing ability.
A score of 95% or higher in a pitch or rhythm test reveals a code on the results screen for one month of Kawaii REC paid access and Effects Rack FULL. Check that screen for achievement and redemption conditions.
The museum's actual homepage. Available tests may change.Chrome extension: Quick Recorder
Chrome Web Store: add the extension from the store, then pin it to your toolbar.
Open the extension, select your microphone and allow microphone access.
Start and stop a recording to save a 24-bit PCM WAV to your device.
Import that WAV into Kawaii REC to edit it.
Local saving and playback are free. Paid users can also enable automatic cloud saving after Google sign-in. For details, see extension support.
Remote MCP: work on audio through conversation
For users with purchased monthly, annual or lifetime plans. Eligibility differs from the 10-hour trial and promotional access. Add this URL in a compatible AI client's connector settings:
Sign in with Google, review the requested project, audio and processing permissions, then authorize the connection.
Attach or specify the WAV and describe the processing you want.
Review the resulting audio and where it was saved.
“Reduce background noise in this WAV, adjust its loudness for YouTube and save it to a new project.”
Supports audio import, analysis, three noise-reduction tools, loudness processing and 24-bit WAV saving while preserving the original. Guidelines: WAV files up to 64 MB, mono or stereo, and up to ten minutes per operation. Check current connection requirements on the official setup page.
How is WebMCP different?
Remote MCP connects to remote audio and cloud processing. WebMCP exposes operations in an open app tab to AI, including checking tracks, mute, solo, volume and pan. A compatible client/browser and eligible purchased paid plan are required.
09 / CREATE TOGETHER
Share your work. Find your creative community.
Submit to the community showcase
Publish a work made with Kawaii REC on YouTube or X.
Sign in with Google and open Submit Kawaii REC Work in the account menu.
Enter the public URL, review the listing conditions and submit it for review.
Submissions are reviewed; sending a link does not guarantee a listing. Submit only work for which you have the required copyright, likeness and other permissions. You retain your rights and grant permission for embedding on the official website and in publicity.Explore community works →
Kawaii COSMOS: five ways to take part
LUNAA role that helps the light reach further, not open to public applications
ASTRAAn open application role for creators: singing, voice, ASMR and readings are welcome
STELLAAn individually invited role selected for vocal talent
SOLAn open application role supporting production through mixing and other specialist skills
LUXA role supporting voice creators through gifts and invitations
Apply for ASTRA and SOL through the dedicated page. Applying does not guarantee selection or an original song. Check activity expectations, duration and benefits in the full application guidelines. Use #KawaiiREC. Posts receiving benefits must also include appropriate advertising disclosures, such as #PR, where required.
Campaign: September 1, 2026, 00:00–October 31, 2026, 23:59 JST
If the paid-support total for this period reaches an additional 1,000, we plan to extend free pitch correction by two months—from October 31 to December 31, 2026. If the target isn't reached, free access ends on October 31.
It uses the site's existing September–October paid-support metric. Eligible activations, Effects Rack purchases and eligible code redemptions during the period are deduplicated per user, then second and later Stripe subscription payments during the period are added. It is not a count of new registrations or currently paying users.
The site uses the same public API and unchanged calculation. If live data is unavailable, saved public data is shown with its timestamp. Updates may lag by a few minutes.
August's milestone and past campaigns
Reaching a paid-support total of 1,001 by the end of August extended free pitch correction through October 31. The August lifetime-plan Rack FULL bundle, Rack launch pricing and CAPIN charity campaign have ended. Purchases now do not qualify for those August offers.
Previously granted Rack FULL access is separate. Eligible annual/lifetime users as of noon on August 12, and eligible lifetime purchasers through August, should check their granted access in their account.
Other ways to get started
The one-month reward for a 95% voice-test score, invitation benefits and card-verified 10-hour trial each have different eligibility rules. Code durations also vary. Review the offer and your account status after applying it.
11 / YOUR ACCOUNT
Choose your plan. Choose where to save. Find what works for you.
The core app has free, US$5/month, US$50/year and US$110 lifetime plans. Monthly, annual and lifetime plans offer the same core features. Effects Rack FULL is a separate add-on.Compare plans →
Lifetime access and update coverage
Keep using your purchased version indefinitely, with the latest updates included for two years from purchase. Later paid major upgrades are 20% off the regular price. Monthly and annual subscribers receive the latest version during their active subscription. Check your account for detailed license status.
Saving, recovery and the cloud
Saving a project is different from exporting finished audio. Keep the project if you want to continue editing. Browser saving works without sign-in; cloud saving requires Google sign-in. Storage is 1 GB free or 8 GB paid. Free accounts have cloud service data deleted after 12 months without a login, so keep important audio on your own device too.
10-hour trials and invitations
After Google sign-in and Stripe card verification, you can try paid features for ten hours, up to three times. Review the conditions shown during setup. Eligible new users following an invitation link receive a 14-day trial without registering a card. Inviters can see achievement requirements and rewards under Invitation Link & Benefits. Self-invites and multiple-account manipulation are excluded.
Codes and gifts
After Google sign-in, enter your code in the redemption screen. Codes may unlock the core app or Rack, temporarily or indefinitely. Check your updated access even if you already have a paid plan. One-year and lifetime gift codes can be purchased for someone else.
Stripe subscribers can review and cancel their subscription using the account menu's management link. Simply closing the app or account panel does not cancel billing. Change email preferences in the account menu or unsubscribe using a link in an email.
Voice-training guidance
Open voice-training guidance in the header to ask AI about singing and vocal technique. Free users have three requests a day; paid users have ten. Use it for gentle practice ideas. If you experience pain or other symptoms, stop and consult an appropriate professional.
12 / TROUBLESHOOTING
Something not working? Check one thing at a time.
Wrong microphone or recording won't start
Check the connection, OS and browser microphone permissions, app input selection and R record-arm state. With an external interface, make several short recordings and play them back to confirm the source. If playback unexpectedly changes output during recording, check headphones, connections and OS audio routing too.
Voice and backing track are out of sync
Check recording-timing measurement and fine adjustment, then make a short test. Bluetooth latency and device load can affect timing; comparing with a wired connection helps narrow down the cause. Also review the clip start position and whether your export range includes leading silence.
No sound in playback or export
Check mute, solo, master volume and output destination. If any tracks are soloed, only those are included. YouTube playback is not included in exports. Listen to the exported file in another player too.
Slow processing or failed video export
Save the project first. Close unnecessary tabs, disable unneeded effects and try exporting a short section to isolate the issue. Device/browser memory and format support affect results. Try a current supported browser; when contacting support, include your OS, browser, steps and error details.
Which features require paid access?
Check your account entitlements and each feature's lock indicator. Core paid access, Rack FULL, partial invitation benefits and Remote MCP have different conditions. If a purchase or code hasn't taken effect, make sure you're signed in with the same Google account.